Today, we're dealing with one of the most versatile 'flowers' that are out there, rosettes! The best thing about rosettes, is that you can make them as masculine or feminine as you want just based on the patterned paper you use. Because you use patterned paper to make them, you can tailor them to go with any layout.
The first thing you need is a 12 inch by 1.5 inch strip of paper (I find double sided paper works best).
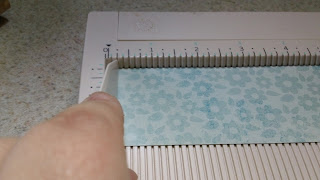
You'll want to use your score board and score the strip of paper at every 1/4 inch.
Remember when you were young and would make those super cool fans out of any paper you had lying around at the time? We're going to fold back and forth on the lines we just scored until it looks like a big accordian thingy.
Now you'll take some glossy accents or a hot glue gun (definitely want a liquid glue for this part) and glue the two edges together.
Take a circle punch (size doesn't matter as long as it is smaller than the rosette) and punch a circle out of some scrap cardstock. Put some liquid adhesive in the center of your circle.
Now, take your rosette and center it over your circle (notice that I am doing it incorrectly in the picture, so don't do what I do) and press down on it in the center to flatten it and press it onto that cardstock circle. (you'll want to hold this down for a few minutes while the glue dries)
And when you are done, you can embellish the center however you want. I used a button for this rosette.
Now, say you like the look of that and all, but you want something a little easier with less steps? Well, Tim Holtz and Sizzix have a die that will cut out the paper for rosettes. It is a flat die and I use it all the time to make my rosettes (it is how I made the smaller rosette pictured above).
The regular rosette die makes one rosette size, and the mini rosette die makes two rosette sizes (the paper strips above were cut with the mini rosette die). The die cuts and scores the paper for you, and then the rest of the steps are the same. With the die above you can either make two separate rosettes or you can layer the paper on top of each other for a neat effect.
Another neat effect that I did with this rosette made from the regular rosette die is to put tissue tape from Ranger along the bottom of the paper strip and then make your folds.
Do you have any other ways that you make rosettes out of the ordinary? Comment to let us know and we'll feature your ideas in another blog post!
Thanks for looking!
Keathe


No comments:
Post a Comment